MonoGame - How to Use Sprite Sheets
By Stephen Armstrong // February 18, 2020
Learn about using sprite sheets to consolidate your graphics and to enable animation.
In this tutorial we assume you have completed the following tutorial and added/loaded the Texture2D "charaset" to your project.
https://www.industrian.net/tutorials/texture2d-and-drawing-sprites/
The following C# code will show you how to use sprite sheets to display graphics in a MonoGame project.
A 2D game requires a lot of sprites for characters and levels. To greatly simplify the number of graphical assets you need to load and keep track of, it’s easier to bundle related sprites into a single image file. This is called a sprite sheet – or alternatively a texture atlas, character set, chipset, or other terms.
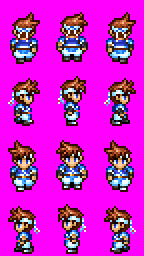
For this example we’re returning to Alex, our good friend from RPGMaker 2000. As you can see from the below image (and from previous tutorials) this texture contains his entire up, right, down, and left movement animation.
Setting a sourceRectangle
In spriteBatch.Draw() you can set a sourceRectangle. This tells the game to only draw the part of the texture within the sourceRectangle.
To give a quick example, use the following code:
// Draw the entire sprite.
spriteBatch.Draw(charaset, new Vector2(100, 100), Color.White);

// Create a sourceRectangle.
Rectangle sourceRectangle = new Rectangle(0, 0, 48, 64);

// Only draw the area contained within the sourceRectangle.
spriteBatch.Draw(charaset, new Vector2(300, 100), sourceRectangle, Color.White);
Now run the code, and you’ll see both the full texture, and one that has the sourceRectangle for the top-left sprite.
![]()
It’s that easy to get an individual sprite from a sprite sheet!
As long as you know the X and Y position of where sprites appear on the sprite sheet – and their width and height – then you can reliably draw them whenever needed.
Simple Animation with Sprite Sheets
The following is a very basic example of how to animate sprites with sprite sheets.
First, go to Game1 and add the following fields:
// A timer that stores milliseconds.
float timer;

// An int that is the threshold for the timer.
int threshold;

// A Rectangle array that stores sourceRectangles for animations.
Rectangle [] sourceRectangles;

// These bytes tell the spriteBatch.Draw() what sourceRectangle to display.
byte previousAnimationIndex;
byte currentAnimationIndex;
Go to LoadContent() and enter the default values for these fields:
// Set a default timer value.
timer = 0;

// Set an initial threshold of 250ms, you can change this to alter the speed of the animation (lower number = faster animation).
threshold = 250;

// Three sourceRectangles contain the coordinates of Alex's three down-facing sprites on the charaset.
sourceRectangles = new Rectangle[3];
sourceRectangles[0] = new Rectangle(0, 128, 48, 64);
sourceRectangles[1] = new Rectangle(48, 128, 48, 64);
sourceRectangles[2] = new Rectangle(96, 128, 48, 64);

// This tells the animation to start on the left-side sprite.
previousAnimationIndex = 2;
currentAnimationIndex = 1;
Go to Draw() and add this simple code to draw the animated sprite:
// Draw the sprite based on the sourceRectangle and currentAnimationIndex .
spriteBatch.Draw(charaset, new Vector2(100, 100), sourceRectangles[currentAnimationIndex], Color.White);
Finally, here comes the logic for animation. Go to Update() and add the following code:
// Check if the timer has exceeded the threshold.
if (timer > threshold)
{
    // If Alex is in the middle sprite of the animation.
    if (currentAnimationIndex == 1)
    {
        // If the previous animation was the left-side sprite, then the next animation should be the right-side sprite.
        if (previousAnimationIndex == 0)
        {
            currentAnimationIndex = 2;
        }
        else

        // If not, then the next animation should be the left-side sprite.
        {
            currentAnimationIndex = 0;
        }

        // Track the animation.
        previousAnimationIndex = currentAnimationIndex;
    }
    // If Alex was not in the middle sprite of the animation, he should return to the middle sprite.
    else
    {
        currentAnimationIndex = 1;
    }

    // Reset the timer.
    timer = 0;
}
// If the timer has not reached the threshold, then add the milliseconds that have past since the last Update() to the timer.
else
{
    timer += (float)gameTime.ElapsedGameTime.TotalMilliseconds;
}
Now run your code, and you will see Alex walking on the spot.
![]()
This is a very simple-but-effective example of how convenient sprite sheets can be. It is also a good start for learning about sprite animation.
Further Reading
Future articles will go into further detail regarding animation and greater use of sprite sheets.